 In this article, we look at how perception and neighboring objects can have a significant, but currently unmeasured, impact on probability of detection
July 18, 2017 | by Emily Gibbons, Marketing Manager (previously Magnetic Particle Product Manager)
.jpg)
Most nondestructive tests which rely on colored or fluorescent materials to identify discontinuities use the human eye as the primary detector. In other words: the inspector needs to see the indication for the test to be successful.
There are many factors which can impact an inspector’s ability to identify an indication such as the amount of ambient light or UV light present, an inspector’s vision acuity and dark adaptation when performing an inspection are just a few examples which are commonly sighted and controlled for under industry standards.
However, there are other factors which influence the ability of an inspector to visually detect an indication which are often under considered when setting-up or performing a magnetic particle inspection or penetrant test procedure.
How Brightness and Color Influence What You See
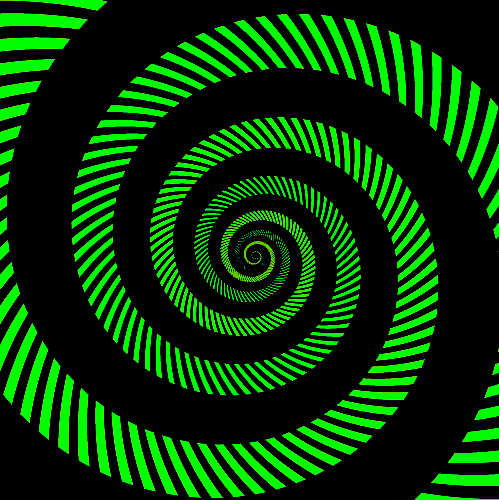
What do you see when you look at this image?
.jpg)
Copyright Akiyoshi Kitaoka 2002 (c)Akiyoshi Kitaoka "Trick eyes" Tokyo: KANZEN 2002
I see a spiral of bright yellow-green and a spiral of turquoise green intercepted by rays of yellow and blue. Clearly, there are two very different shades of green.
But I’m wrong… There is only one shade of green. The bright yellow-green spiral and the turquoise green spiral are exactly the same color.
Don’t believe me? You could measure the pixel color values of each spiral or use a colorimeter to measure the color, but the results will show you the bright yellow-green and the turquoise green in the image above are the same bright green color.
To prove this, we can start by replacing the blue background in the first image with black:
.jpg)
The two green spirals start to look like they aren’t so different. I still see two different shades of green but the turquoise spiral looks more green to me in this image.
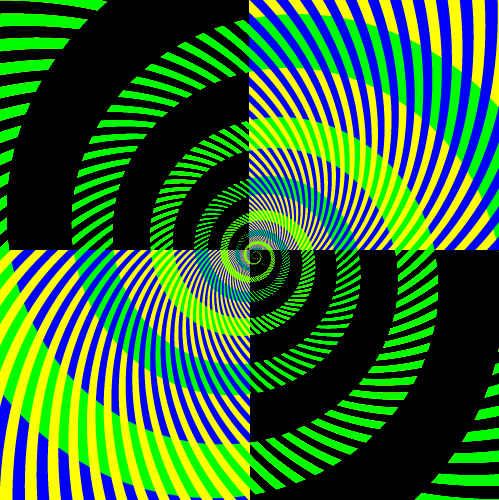
Next we will remove the yellow background:
.jpg)
Now it is obvious the spirals are the same shade of green.
Think I changed the colors on you?
If we juxtapose the original image (with the yellow and blue background) with the final modified image (with the black background) you can follow a single spiral to see that the shade of green shade stays the same.
This demonstration is more than an impressive parlor trick – it can be used to show how subjective our color perceptions can be during fluorescent NDT inspections.
So how does this illusion work?
According to Ben Backus of Backus Labs and SUNY's College of Optometry,
“This illusion works because the visual system measures color at a coarser spatial scale than luminance (i.e., brightness). Thus the apparent color of a small object can be contaminated by the colors of neighboring objects, which is very nicely demonstrated by this illusion. When green is sandwiched between yellow it looks much yellower than when it is sandwiched between blue.”
In other words, how we perceive the color of an object is often determined by the colors and brightness of neighboring objects, and this effect is amplified when looking at small objects or features – such as indications or discontinuities.
Human eyes, as well as other detection devices, use contrast to detect an indication during and NDT inspection so it is critical for there to be sufficient contrast between the indication and the rest of the surface. Otherwise it will be harder for the inspector to see the indication, especially if the indication is very fine.
The higher the contrast between the indication and the background, the more likely the inspector is to see the indication.
When it comes to magnetic particle and penetrant testing, there are two types of contrast to consider: brightness contrast and color contrast.
Brightness Contrast
Brightness refers to the amount of light reflected by a surface, which we see as how “light” or “dark” a color or image is.
An object with high brightness will reflect most of the light that hits its surface, making the object appear “light” or “bright”.
A low brightness object will absorb much of the light hitting it, so the object appears “dark”.
Brightness contrast is the difference in brightness of two adjacent surfaces.
In NDT inspections, it doesn’t matter if the indication is high or low brightness, it just matters that the rest of the surface, the background, is the opposite brightness.
Brightness Contrast in Visible Testing
Visible penetrant and magnetic particle indications are typically low brightness (examples: red penetrant or black mag particles) against a high brightness background (like the white background produced by developer or contrast paint).
The brightness contrast ratio for most visible light testing is 9:1, which is enough for the human eye to detect as long as the indication is large enough to be resolved.
Brightness Contrast in Fluorescent Testing
In fluorescent NDT inspections, the indication is very bright because the fluorescent material absorbs high-energy UV light, which is invisible to our eyes, and reflects this light back at a lower energy level, which is visible to our eyes and which we perceive as “glowing” light.
But since UV light contains more energy than visible light, when the fluorescent dye reflects visible light back to our eyes, they reflect MORE visible light, which creates the “glow” we see.
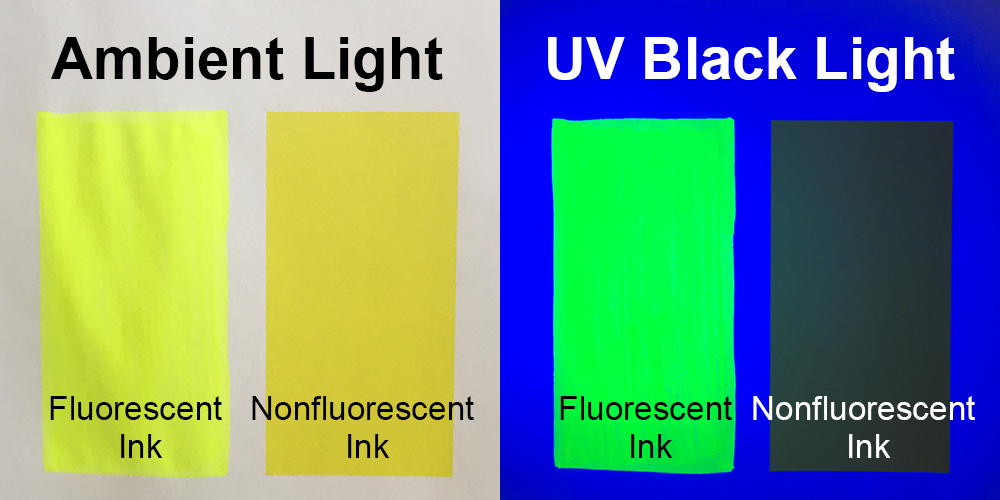 Also, without any ambient visible light in the darkened inspection area, our eyes receive more of the reflected light from the fluorescent dye than if there was other visible white light present.
The “glowing” high brightness fluorescent indications contrast strongly with the low contrast background in the darkened environment to produce a large brightness contrast ratio of 200:1 or higher, significantly more than the ratio in visible light testing.
Color Contrast
Color contrast is the difference in color (wavelength) and saturation (amount of the wavelength) between two colors of equal brightness.
Despite the dramatic visual illusion I opened with, color contrast plays a smaller part in NDT detectability than brightness, but it is still an important factor to consider when selecting materials and lighting for a mag particle test or penetrant inspection.
However, just like with brightness, in NDT the most important factor for colors is how different the color of the indication is from the color of the rest of the part.
In visible and fluorescent penetrant inspections, developers are commonly used to improve color contrast because they produce a bright white background which reflects back significantly more light than the penetrant, consequently increasing the indication contrast. The same is true for white contrast paint used in visible magnetic particle inspections.
How Brightness and Contrast Impact NDT Inspections
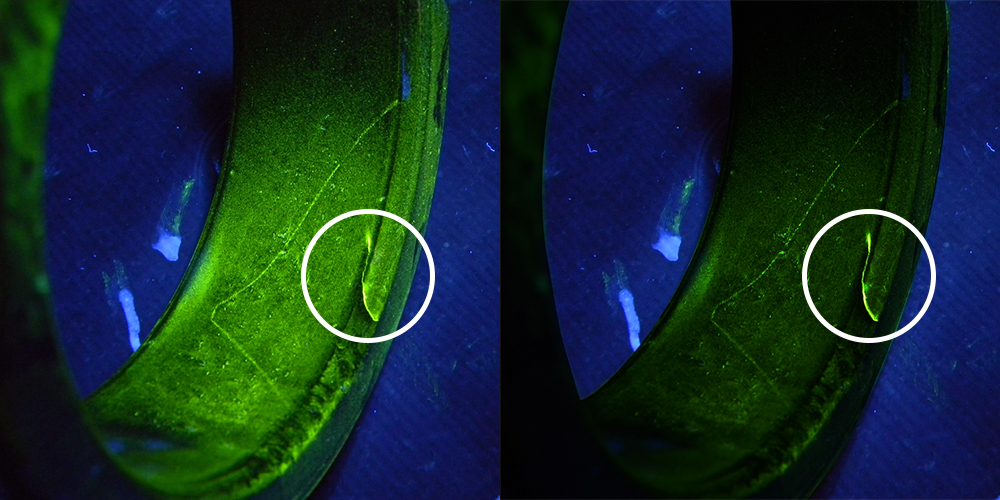
In the color illusion at the beginning of this article you saw how surrounding colors and brightness can literally transform the things we see. Above you can see how much more an indication stands out when the background is much darker than the fluorescent indication.
The same principle applies when inspectors are evaluating a part for indications: what is going on around the indication WILL impact the inspector’s ability to identify the indication. This could be excess fluorescent background like the left-hand image above, too much visible light in the booth area, not using developer or white contrast paint to reduce surface background.
There are many factors which go into making sure the indication/background contrast is as high as possible for the most reliable inspections.
Tips – Put This Knowledge to Use
1. Use the right penetrant / magnetic particles for the application
It might be tempting to use the smallest magnetic particles or highest sensitivity penetrant available, but depending on the application, this might give you a lower quality inspection overall if you end up with glowing green parts with excess background or find lots of nonrelevant indications.
Make sure to be careful when selecting the right materials for your specific application to maximize your probability of finding all relevant indications.
For penetrants, it is important for the penetrant’s fluorescence to stand up through processing so indications are still crisp and bright when they are evaluated. Some penetrants can break down under heat (in a dryer) and under strong UV light (in a bright UV inspection booth), so make sure you have a robust penetrant that is designed to keep its fluorescence. This is especially important if your specs call for longer drying times, or if there is a time delay between when the parts are processed and when they are inspected.
For magnetic particles, look for durable magnetic particles that won’t break down over time. Less durable particles will have their fluorescent pigment separate from the iron particle over time, and will result in indications with less fluorescent and will cause excess background which can hide indications. It is also important that the particles don’t clump together, clumpy particles don’t move freely to indications and product a splotchy surface which can mask indications.
2. Always use developer or white contrast paint
Penetrant developers and white contrast paint are designed to improve the contrast in penetrant testing and visible mag particle inspections, and they work.
Look for a developer or white contrast paint that gives bright-white, even, opaque coverage. With a good developer or white contrast paint you won’t be able see the part surface at all, even with just a thin coating of product.
Aim to apply the thinnest layer of developer or white contrast paint possible which still gives you fully opaque coverage.
3. Make sure your carrier, cleaner, etc. is NDT-approved
Make sure the only material with fluorescence is your penetrant or magnetic particles.
Non-NDT-specific carrier oils often fluoresce under UV light, which creates an automatic background on any part surface and interferes with the inspection. The same is true for any additive or cleaner which is put on the surface of the part.
Don’t ruin a carefully thought out and executed inspection by using a non-NDT-approved carrier, cleaner or additive.
Non-destructive testing is an industry with numerous controls and standard requirements, for good reason! When safety is on the line it is important for everyone connected with NDT to do their part to make sure every inspection is done right.
The next time you set up a mag particle test or perform a penetrant inspection, give some thought to background, brightness and color and ask yourself if you are certain you or your inspectors are seeing everything you need to find.
Do you have a story about how background impacted one of your NDT inspections?
What tips do you have for improving contrast in mag particle or penetrant inspections?
Share your knowledge in the comments section below.
Acknowledgments
Check out the original article I read on the illusion mentioned in the first section, The Green You See Is Not The Green You See, for more information on this experiment and its underlying causes. Thank you to Tania Lombrozo for allowing me to use excerpts from this original post.
Thank you also to Akiyoshi Kitaoka for giving us permission to use his “Green Spirals” image.
Lastly, I used the new ASNT Nondestructive Testing Handbook on Liquid Penetrant Testing (in color!) as a reference for this article and highly recommend it.